
TouchMaster Thermostat
An in-home design, touch screen thermostat.
Color and Aesthetics
"Dark Mode," a trending color scheme with a dark background and light text for contrast and clarity.
Contrast is easier on the eyes and more aesthetically appealing
A plus for older users that may have a harder time navigating the screen
Main Screen and Thermostat
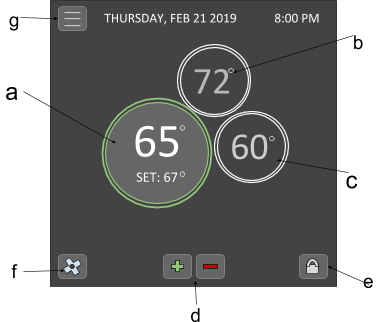
01 / Top
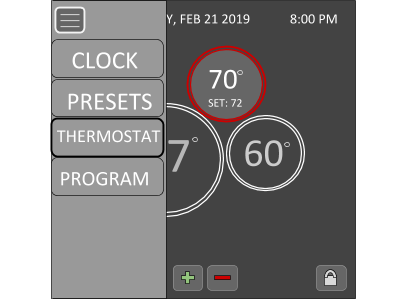
- (g) Hamburger menu, when selected will show from the left with four options: clock, presets, thermostat (main screen), and program.
- Date and time
- Digital format and capitalization for easy reading
02 / Center
- Three "bubbles" for main modes: (a) auto, (b) heat, and (c) cool
- Main feature at the center of vision for attention
- Bubbles next to each other support proximity-compatibility principle
- Digital temperatures are shown because checking current indoor temperature is a point estimation task and analog is not necessary and would cause more confusion
- Each bubble, when selected changes colors: Blue shows cold, red shows heat, green shows on, white is off.
03 / Bottom
- (d) Plus and minus buttons allow changing set temperature by one point
- (e) The lock can be selected to "lock" the set temperature, so children cannot mess with the thermostat. (Use of lock symbol allows for concrete understanding due to pictorial realism)
- (f) A fan setting (represented by fan icon) when selected, a pop-up will display with ascending steps that can be selected to choose the strength of the fan. When selected again the pop-up will disappear.
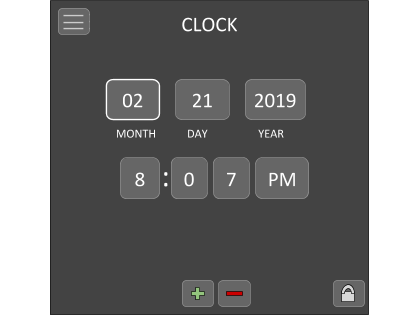
Clock
The clock screen has a simple interface allowing to choose the month, date, and year which can be changed with the same plus and minus buttons as the home screen.
There are labels nearby to clearly show which box represents what, reducing looking back and forth from the main screen back to the clock screen.
The time of day is the same right below. To change a specific point, one simply needs to click on the desired point to change (e.g. hour or minute).
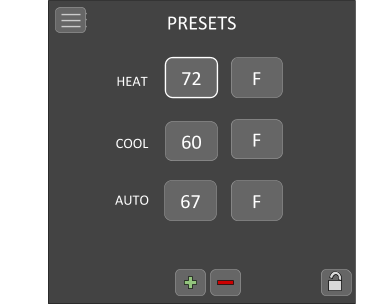
Presets
The interface is similar to that of the clock in which there are "slots" to change the presets for heat, cool, or auto temperature.
There is also the option to change the scale of the temperature: Fahrenheit or Celsius. Including this here eliminates clutter from the home screen.
To change the temperature, again one simply selects the desired point to change and use the plus and minus buttons to change the degree point or scale.
This screen will also have a lock button, similar to the home screen, to lock these presets.
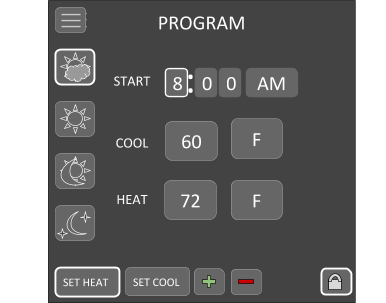
Program
The program screen has many components. To the left there are four buttons for morning, day, evening, and night. Images for icons of a sun and moon is good for:
- international communication
- pictorial realism
- elimination of too many words
- concreteness.
When selected, there is a start time that can be set and changed with the plus and minus buttons
One can easily set the heat and/or cool temperature. To select one of the presets, the bottom has a “set heat” or “set cool” button.
This differs from the preset screen because programming and setting a temperature will automatically turn on, rather than physically selecting the "bubble" on the main screen.
Back to Main Screen
There is an energy saving component which will make the screen go “off” after 5 minutes without interaction.
The 2D design is important in a thermostat for simplicity. Ideally, the only "depth" present would be a gradient or shadowing for aesthetic purposes, which unfortunately could not be included in these simple wireframes.
The shadowing and gradient would also aid comprehension to what the user is making changes to, for it would mimic the look of a physical thermostat or dial, similar to that in a tactile display.